Oracle APEXアプリケーション・ビルダー・ユーザーズ・ガイド Release 22.2
10.1 Oracle APEXとのOracle JETの統合の理解10.1.2 Oracle JETがOracle APEXと統合する仕組み
ノート:Oracle JETには双方向データ・バインディング(knockout.jsを使用)が用意されていますが、現在のAPEXでは、ツールキットのこの側面はネイティブに使用されません。Oracle JETのカスタム・エレメントが静的コンテンツとして生成される場合、または動的コンテンツであっても、カスタム・エレメントをIDで特定できる場合は、そのカスタム・エレメントに対応するバインディング・コンテキスト(JavaScriptのオブジェクト)を作成してknockout.jsのapplyBindingsを呼び出すことができます。しかし、レポート(クラシック・レポート、対話モード・レポート、対話グリッド)の列にJETチャートを表示する場合や、カード・リージョンのカード上に表示するケースでは、難しい実装になります。
そのようなケースでもOracle JETのチャートを利用できるように、属性itemsが用意されています。属性itemsにチャートとして表示するデータ(JSONドキュメント)を与えると、そのデータを使ったチャートが描画されます。
ただし、Oracle JETはknockout.jsと一緒に使用することを想定しているためか、Oracle JET API ReferencesのそれぞれのElementsのAttributes一覧にitemsは含まれていません。Type DefinitionsにItemがあれば、それをひとつのオブジェクトとした配列をitemsに与えることができるようです。
本記事では以下のようなアプリケーションを作成し、Knockoutを使用しないJETチャートの実装方法を確認します。
JET Picto Chartをサンプルの実装に使用します。Picto Chart(カスタム・エレメントはoj-picto-chart)のリファレンスより、以下のType DefinitionsのItemを参照します。
Picto Chartとして表示されるそれぞれのアイテムには、表示色とツールチップの情報が必要です。Itemの定義を参照するとcolorとnameがその情報に対応することがわかります。
color | string | <optional> | The color of the item. Does not apply if custom image is specified. |
name | string | <optional> | The name of the item. Used for default tooltip and accessibility. |
以上より属性itemsには以下のようなデータを与えることにします。
[
{
"color": 色情報,
"name": "ツールチップとなる文字列"
},
{
"color": 色情報,
"name": "ツールチップとなる文字列"
},
... 繰り返し
]
アプリケーションで使用するデータは、Open-Meteo.comのFree Weather APIを呼び出して取得しています。使用にあたっては、ライセンスおよびPricingについて、ご自身で確認していただくようお願いします。Terms & Privacyに説明がありますが、非商用であれば無料で利用できます。
以下より実装について説明します。
Open-Meteo.comのAPIを呼び出す際に引数とする都市のマスター・データを保存する表HMT_CITIESと、その都市ごとの最高気温を保存する表HMT_CITY_TEMPERATURESを作成します。
表の作成には、以下のクイックSQLのモデルを使用します。
# prefix: hmt
cities
city_name vc80 /nn
latitude num /nn
longitude num /nn
timezone vc20 /nn
city_temperatures
date_rec date /nn
temperature_2m_max num
SQLの生成、SQLスクリプトを保存、レビューおよび実行を順次実施します。表の作成までを行い、アプリケーションの作成は行いません。
表HMT_CITIESにいくつかの都市の情報を保存します。
SQLコマンドを開き、以下を実行します。SQLコマンドで実行できるのは1行のSQLなので、begin/endでINSERT文を囲んでいます。
begin
Insert into HMT_CITIES (CITY_NAME,LATITUDE,LONGITUDE,TIMEZONE) values ('Tokyo',35.6895,139.6917,'Asia/Tokyo');
Insert into HMT_CITIES (CITY_NAME,LATITUDE,LONGITUDE,TIMEZONE) values ('New York',40.7143,-74.006,'America/New_York');
Insert into HMT_CITIES (CITY_NAME,LATITUDE,LONGITUDE,TIMEZONE) values ('London',51.5085,-0.1257,'Europe/London');
Insert into HMT_CITIES (CITY_NAME,LATITUDE,LONGITUDE,TIMEZONE) values ('Berlin',52.5244,13.4105,'Europe/Berlin');
Insert into HMT_CITIES (CITY_NAME,LATITUDE,LONGITUDE,TIMEZONE) values ('Paris',48.8534,2.3488,'Europe/Paris');
Insert into HMT_CITIES (CITY_NAME,LATITUDE,LONGITUDE,TIMEZONE) values ('Sydney',-33.8678,151.2073,'Australia/Sydney');
end;
実行結果に1行が挿入されました。と表示されますが、エラーが発生しなければ全行挿入されています。
アプリケーション作成ウィザードを起動します。アプリケーションの名前はJET without Knockoutとします。
ページの追加をクリックします。
表HMT_CITIESおよびHMT_CITY_TEMPERATURESの内容を手動で編集することは想定していませんが、内容を確認できるようにマスター・ディテールのページを作成します。
マスター・ディテールを選択します。
ページ名はCities and Temperatures、形式に積上げを選択します。(マスター)表にHMT_CITIES、ディテール表にHMT_CITY_TEMPERATURESを指定します。
ページの追加をクリックします。
アプリケーションの作成を実行します。
アプリケーションが作成されます。
Open-Meteoよりデータを取り込む処理とPicto Chartに与えるJSONドキュメントを表HMT_CITY_TEMPERATURESより取り出す処理を、PL/SQLパッケージHMT_UTILにまとめました。
以下のコードを実行し、パッケージHMT_UTILを作成します。SQLスクリプトなどを使用すると良いでしょう。
This file contains bidirectional Unicode text that may be interpreted or compiled differently than what appears below. To review, open the file in an editor that reveals hidden Unicode characters.
Learn more about bidirectional Unicode characters
create or replace package "HMT_UTIL" as | |
/** | |
* 表HMT_CITIESに定義されている都市の最高気温(temperature_2m_max)を | |
* 取得期間を指定してOpen-Meteo.comから取得する。 | |
* 取得したデータは表HMT_CITY_TEMPERATURESに保存する。 | |
* 同じ都市、同じ期間のデータがあれば入れ替える。 | |
* | |
* Ref. Open-Meteo API | |
* Terms of Use: https://open-meteo.com/en/terms | |
* License: https://open-meteo.com/en/license | |
*/ | |
procedure load_from_open_meteo( | |
p_city_id in number | |
,p_start_date in date | |
,p_end_date in date | |
); | |
/** | |
* Picto Chartに与える一ヶ月分の最高気温の配列を | |
* JSONの配列として返す。 | |
* HMT_CITIESのIDと年月の指定をYYYY-MM形式の文字列として | |
* 渡す。p_shapeの指定によりデフォルトの四角を他のシェイプに変更できる。 | |
*/ | |
function generate_temperatures_by_month( | |
p_city_id in varchar2 | |
,p_month in varchar2 -- format YYYY-MM | |
,p_shape in varchar2 default 'square' | |
) | |
return clob; | |
end "HMT_UTIL"; | |
/ | |
create or replace package body "HMT_UTIL" as | |
procedure load_from_open_meteo( | |
p_city_id in number | |
,p_start_date in date | |
,p_end_date in date | |
) | |
as | |
/* データ取得期間 */ | |
l_start_date_str varchar2(10); | |
l_end_date_str varchar2(10); | |
l_start_date date; | |
l_end_date date; | |
/* API呼び出し */ | |
l_response clob; | |
l_response_json json_object_t; | |
l_parm_name constant varchar2(400) := 'latitude:longitude:start_date:end_date:daily:temperature_unit:timezone'; | |
l_parm_value varchar2(400); | |
/* レスポンスから日付と最高気温を取り出す。 */ | |
l_daily json_object_t; | |
l_count pls_integer; | |
l_date_arr json_array_t; | |
l_temp_arr json_array_t; | |
l_date date; | |
l_temp number; | |
e_open_meteo_get_failed exception; | |
begin | |
/* データ取得期間を決める。 */ | |
l_start_date := p_start_date; | |
l_start_date_str := to_char(p_start_date,'YYYY-MM-DD'); | |
l_end_date := p_end_date; | |
/* 終了日は今日の日付を超えてはいけない。 */ | |
if l_end_date > trunc(sysdate) then | |
l_end_date := trunc(sysdate); | |
end if; | |
l_end_date_str := to_char(l_end_date, 'YYYY-MM-DD'); | |
/* Open Meteoの呼び出し - ID指定なのでループは1回だけ */ | |
for r in (select * from hmt_cities where id = p_city_id) | |
loop | |
l_parm_value := r.latitude || ':' || r.longitude || ':' || l_start_date_str || ':' || l_end_date_str || ':temperature_2m_max:celsius:' || r.timezone; | |
apex_debug.info(l_parm_value); | |
apex_web_service.set_request_headers('Content-Type','application/json'); | |
l_response := apex_web_service.make_rest_request( | |
p_url => 'https://archive-api.open-meteo.com/v1/archive' | |
,p_http_method => 'GET' | |
,p_parm_name => apex_string.string_to_table(l_parm_name) | |
,p_parm_value => apex_util.string_to_table(l_parm_value) | |
); | |
if apex_web_service.g_status_code <> 200 then | |
apex_debug.info(l_response); | |
raise e_open_meteo_get_failed; | |
end if; | |
end loop; | |
l_response_json := json_object_t(l_response); | |
/* 本当はレスポンスの検証は必要 */ | |
l_daily := l_response_json.get_object('daily'); | |
l_date_arr := l_daily.get_array('time'); | |
l_temp_arr := l_daily.get_array('temperature_2m_max'); | |
l_count := l_date_arr.get_size(); -- l_temp_arrのサイズも同じ。 | |
/* 同じリクエストで取得したデータは消去する。 */ | |
delete from hmt_city_temperatures | |
where city_id = p_city_id and date_rec between l_start_date and l_end_date; | |
for i in 1..l_count | |
loop | |
l_date := to_date(l_date_arr.get_string(i-1), 'YYYY-MM-DD'); | |
l_temp := l_temp_arr.get_number(i-1); | |
insert into hmt_city_temperatures(city_id, date_rec, temperature_2m_max) | |
values(p_city_id, l_date, l_temp); | |
end loop; | |
end load_from_open_meteo; | |
function generate_temperatures_by_month( | |
p_city_id in varchar2 | |
,p_month in varchar2 -- format YYYY-MM | |
,p_shape in varchar2 | |
) | |
return clob | |
as | |
l_day pls_integer; -- 日曜日から1日までの日数 | |
l_selected_date date; -- DATE型の指定月 | |
l_items clob; -- Picto ChartのソースとなるJSONデータ | |
begin | |
l_selected_date := to_date(p_month, 'YYYY-MM'); | |
/* 日曜日から1日までの穴埋めをする */ | |
l_day := to_number(to_char(l_selected_date,'D')); | |
select json_arrayagg(j) into l_items from | |
( | |
( | |
select json_object( | |
key 'id' value 0 | |
,key 'color' value 'rgba(0,0,0,0)' | |
,key 'shape' value p_shape | |
,key 'name' value '' | |
) as j | |
from dual connect by level <= l_day | |
) | |
union all | |
( | |
select json_object( | |
key 'id' value rownum | |
,key 'color' value | |
case | |
when temperature_2m_max < -20 then | |
'rgb(68,1,84)' | |
when temperature_2m_max < -10 then | |
'rgb(68,57,131)' | |
when temperature_2m_max < 0 then | |
'rgb(49,104,142)' | |
when temperature_2m_max < 10 then | |
'rgb(33,145,140)' | |
when temperature_2m_max < 20 then | |
'rgb(53,183,121)' | |
when temperature_2m_max < 30 then | |
'rgb(144,215,67)' | |
else | |
'rgb(253,231,37)' | |
end | |
,key 'shape' value p_shape | |
,key 'name' value to_char(date_rec,'YYYY-MM-DD') || ' (' || temperature_2m_max || ')°C' | |
) as j | |
from hmt_city_temperatures | |
where city_id = p_city_id | |
and trunc(date_rec,'MONTH') = l_selected_date | |
) | |
); | |
return l_items; | |
end generate_temperatures_by_month; | |
end "HMT_UTIL"; | |
/ |
ページCities and TemperaturesにOpen-Meteo.comよりデータを取得する処理を組み込みます。
ページ・デザイナにてページCities and Temperaturesを開きます。
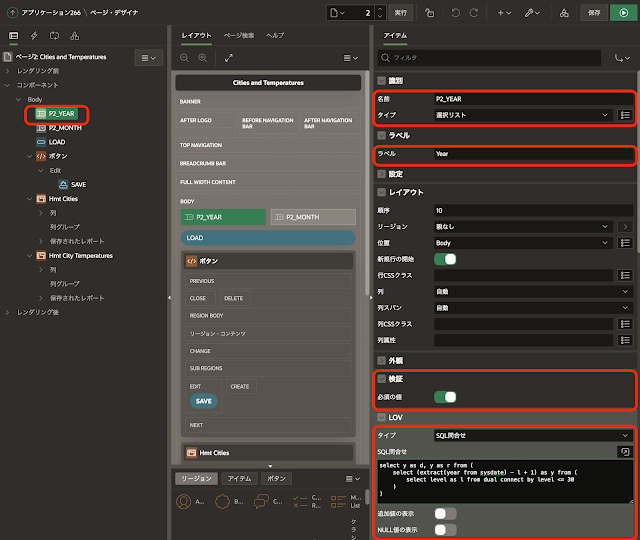
データを取得する年を指定するページ・アイテムP2_YEARを作成します。
識別のタイプは選択リスト、ラベルはYear、検証の必須の値はオンとします。
LOVのタイプにSQL問合せを選択し、SQL問合せとして以下を記述します。現在の年から過去30年を表示の対象として選択できます。
This file contains bidirectional Unicode text that may be interpreted or compiled differently than what appears below. To review, open the file in an editor that reveals hidden Unicode characters.
Learn more about bidirectional Unicode characters
select y as d, y as r from ( | |
select (extract(year from sysdate) - l + 1) as y from ( | |
select level as l from dual connect by level <= 30 | |
) | |
) |
追加値の表示、NULL値の表示はオフとします。
データを取得する月を指定するページ・アイテムP2_MONTHを作成します。
識別のタイプは選択リスト、ラベルはMonth、検証の必須の値はオンとします。ページ・アイテムP2_YEARの右隣に配置するため、レイアウトの新規行の開始をオフにします。
LOVのタイプにSQL問合せを選択し、SQL問合せとして以下を記述します。
This file contains bidirectional Unicode text that may be interpreted or compiled differently than what appears below. To review, open the file in an editor that reveals hidden Unicode characters.
Learn more about bidirectional Unicode characters
select l as d, l as r from ( | |
select level as l from dual connect by level <= 12 | |
) |
追加値の表示、NULL値の表示はオフとします。
登録されているすべての都市を対象として、指定した1ヶ月間の日毎の最高気温のデータを、Open-MeteoのWeather APIより取得します。
ボタンLOADを作成します。
ラベルはLoad from Open-Meteo.comとします。外観のテンプレート・オプションのWidthとしてStretchを選択します。
動作のアクションはデフォルトのページの送信のまま変更しません。
プロセス・ビューを開き、ボタンLOADをクリックしたときに実行されるプロセスを作成します。
識別の名前はLoad from Open-Meteo.com、タイプはコードの実行を選択します。
ソースのPL/SQLコードとして以下を記述します。
This file contains bidirectional Unicode text that may be interpreted or compiled differently than what appears below. To review, open the file in an editor that reveals hidden Unicode characters.
Learn more about bidirectional Unicode characters
declare | |
l_start_date date; | |
l_end_date date; | |
begin | |
/* | |
* 指定した年の指定した一ヶ月間の最高気温をHMT_CITIESに登録されている | |
* すべての都市について取得する。 | |
*/ | |
l_start_date := to_date(:P2_YEAR || '-' || :P2_MONTH, 'YYYY-MM'); | |
l_end_date := add_months(l_start_date, 1) - 1; | |
for r in (select * from hmt_cities) | |
loop | |
hmt_util.load_from_open_meteo( | |
p_city_id => r.id | |
,p_start_date => l_start_date | |
,p_end_date => l_end_date | |
); | |
end loop; | |
end; |
サーバー側の条件のボタン押下時にLOADを指定します。
以上でデータのロードができるようになりました。
一旦ページを実行し、2023年8月のデータをロードします。
Yearに2023、Monthに8を選択し、ボタンLoad from Open-Meteo.comをクリックします。
下の対話グリッドに(上の対話グリッドで)選択した都市の最高気温が表示されると、データのロードは成功しています。
ページ・デザイナでホーム・ページを開きます。
Breadcrumb BarにあるリージョンJET without Knockoutと、Bodyにあるリージョンページ・ナビゲーションを削除します。
Picto Chartを表示する都市を選択するページ・アイテムP1_CITYを作成します。
タイプとして選択リストを選び、ラベルはCityにします。
LOVのタイプとしてSQL問合せを選択し、SQL問合せとして以下を記述します。
select city_name d, id r from hmt_cities order by city_name asc
追加値の表示はオフ、NULL値の表示をオンにしてNULL表示値に- 都市を選択 -と記述します。
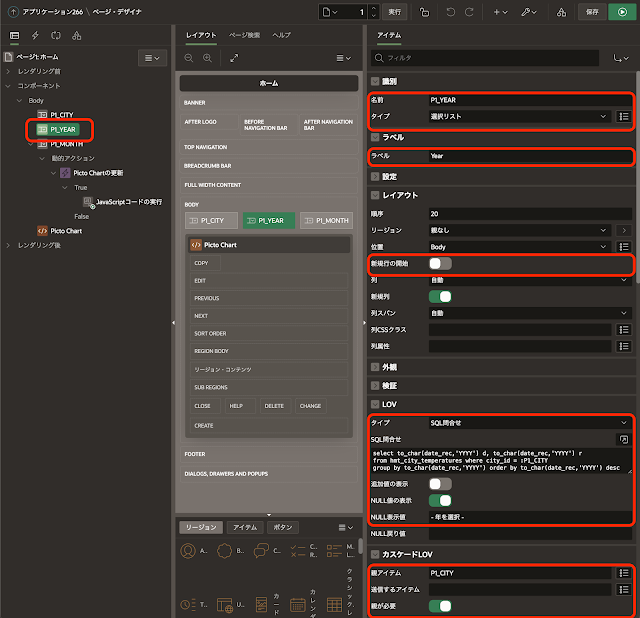
Picto Chartを表示する年を選択するページ・アイテムP1_YEARを作成します。
タイプとして選択リストを選び、ラベルはYearにします。ページ・アイテムP1_CITYの右隣に配置するため、レイアウトの新規行の開始をオフにします。
LOVのタイプとしてSQL問合せを選択し、SQL問合せとして以下を記述します。
select to_char(date_rec,'YYYY') d, to_char(date_rec,'YYYY') r
from hmt_city_temperatures where city_id = :P1_CITY
group by to_char(date_rec,'YYYY') order by to_char(date_rec,'YYYY') desc
追加値の表示はオフ、NULL値の表示をオンにしてNULL表示値に- 年を選択 -と記述します。
カスケードLOVの親アイテムにP1_CITYを指定し、親が必要をオンにします。
Picto Chartを表示する月を選択するページ・アイテムP1_MONTHを作成します。
タイプとして選択リストを選び、ラベルはMonthにします。ページ・アイテムP1_YEARの右隣に配置するため、レイアウトの新規行の開始をオフにします。
LOVのタイプとしてSQL問合せを選択し、SQL問合せとして以下を記述します。
select to_char(date_rec,'MM') d, to_char(date_rec,'MM') r
from hmt_city_temperatures
where city_id = :P1_CITY and to_char(date_rec,'YYYY') = :P1_YEAR
group by to_char(date_rec,'MM') order by to_char(date_rec,'MM') asc
追加値の表示はオフ、NULL値の表示をオンにしてNULL表示値に- 月を選択 -と記述します。
カスケードLOVの親アイテムにP1_CITYとP1_YEARを指定し、親が必要をオンにします。
Picto Chartを表示するリージョンを作成します。
識別のタイトルはPicto Chart、タイプは静的コンテンツです。
ソースのHTMLコードに以下を記述します。属性itemsは動的アクションで設定するため、空の配列を与えています。
This file contains bidirectional Unicode text that may be interpreted or compiled differently than what appears below. To review, open the file in an editor that reveals hidden Unicode characters.
Learn more about bidirectional Unicode characters
<oj-picto-chart | |
id="pictochart1" | |
items="[]" | |
layout="horizontal" | |
row-height="20" | |
column-count="7"> | |
<template slot="itemTemplate" data-oj-as="item"> | |
<oj-picto-chart-item | |
color="[[item.data.color]]" | |
name="[[item.data.name]]" | |
shape="[[item.data.shape]]"> | |
</oj-picto-chart-item> | |
</template> | |
</oj-picto-chart> |
プロセス・ビューを開き、属性itemsに設定するデータを返すAjaxコールバックを作成します。
識別の名前はGET_DATA、タイプとしてコードを実行を選択します。
ソースのPL/SQLコードとして以下を記述します。
This file contains bidirectional Unicode text that may be interpreted or compiled differently than what appears below. To review, open the file in an editor that reveals hidden Unicode characters.
Learn more about bidirectional Unicode characters
declare | |
l_month varchar2(7); | |
l_data clob; | |
begin | |
l_month := :P1_YEAR || '-' || :P1_MONTH; | |
l_data := hmt_util.generate_temperatures_by_month( | |
p_city_id => :P1_CITY | |
,p_month => l_month | |
,p_shape => 'circle' | |
); | |
-- apex_debug.info(l_data); | |
htp.p(l_data); | |
end; |
ページ・アイテムP1_MONTHに値が選択されたときに、動的アクションを実行してPicto Chartの描画を行います。
ページ・アイテムP1_MONTHに動的アクションを作成します。
識別の名前はPicto Chartの更新とします。タイミングのイベントはページ・アイテムのデフォルトである変更です。
クライアント側の条件のタイプとしてアイテムはnullではないを選択し、アイテムにP1_MONTHを選択します。実際はP1_CITY、P1_YEARもnullだとデータの取得に失敗しますが、親が必要をオンにしたカスケードLOVであるためP1_MONTHに値があれば、他のページ・アイテムにも必ず値があります。
TRUEアクションとしてJavaScriptコードの実行を選択します。
設定のコードとして以下を記述します。AjaxコールバックGET_DATAを呼び出して取得したJSON形式のデータ(ノードの色、ツールチップ、形状を含む配列)をPicto Chartのitemsに設定しています。
This file contains bidirectional Unicode text that may be interpreted or compiled differently than what appears below. To review, open the file in an editor that reveals hidden Unicode characters.
Learn more about bidirectional Unicode characters
apex.server.process( "GET_DATA", | |
{ | |
pageItems: ["P1_CITY","P1_YEAR","P1_MONTH"] | |
}, | |
{ | |
success: (data) => { | |
let pictoChart1 = document.getElementById("pictochart1"); | |
let busyContext = oj.Context.getContext(pictoChart1).getBusyContext(); | |
busyContext.whenReady().then(function() { | |
pictoChart1.items = data; | |
}); | |
} | |
} | |
) |
ページのロード時にもPicto Chartの表示を試みるように、実行の初期化時に実行をオンにします。この場合、動的アクションに設定したクライアント側の条件は適用されません。そのため、TRUEアクションのクライアント側の条件に、動的アクションと同じ条件を設定します。
ページ・プロパティのJavaScriptとCSSのセクションに、Oracle JETを組み込むために必要な設定を行います。
JavaScriptのファイルURLに以下を記述します。
[require jet]
JavaScriptのページ・ロード時に実行に以下を記述します。
require(["ojs/ojcore", "ojs/ojpictochart"], function(oj) {});
CSSのファイルURLに以下を記述します。
#JET_CSS_DIRECTORY#redwood/oj-redwood-notag-min.css
CSSのインラインに以下を記述します。ツールチップの表示に含まれる不要な文字列を隠すために使用します。
.oj-dvt-datatip-value {
display: none;
}
以上でアプリケーションは完成です。
今回作成したAPEXアプリケーションのエクスポートを以下に置きました。
https://github.com/ujnak/apexapps/blob/master/exports/jet-without-knockout.zip
Oracle APEXのアプリケーション作成の参考になれば幸いです。
完