ラベル Customer Managed ORDS の投稿を表示しています。 すべての投稿を表示

2022年11月28日月曜日

ロード・バランサを構成しORDSの可用性を確保する(2) - ロード・バランサの作成

Customer Managed ORDSが実行されている2つのコンピュート・インスタンスのフロントとなる ロード・バランサを作成します。バックエンドはHTTP接続をポート8080で待ち受けます。ロード・バランサはHTTPS接続を標準のポート443で待ち受けます。サーバー証明書として、OCIの証明書サービスで作成したものを使用します。


ロード・バランサの作成


OCIのコンソールよりネットワーキングロード・バランサを開きます。ロード・バランサの作成をクリックします。


ロード・バランサ・タイプの選択として、ロード・バランサを選択します。ロード・バランサの作成をクリックします。


ロード・バランサ名は任意です。今回はlb-testservとしました。可視性タイプの選択パブリックパブリックIPアドレスの割当てエフェメラルIPアドレスを選択します。Always Free枠のロード・バランサのシェイプ最小帯域幅および最大帯域幅は、ともに10Mbpsです。

ネットワーキングの選択に含まれる仮想クラウド・ネットワークおよびサブネットとして、あらかじめ作成済みのネットワークを指定します。

へ進みます。


ロード・バランシング・ポリシーの指定として重み付けラウンド・ロビンを選択します。

バックエンドの追加をクリックしてバックエンドを追加します。


画面右にドロワーが開きます。ロード・バランサのバックエンドとなるコンピュート・インスタンス(今回の例ではCMRODS1CMORDS2)を選択します。

選択したバックエンドの追加をクリックし、ドロワーを閉じます。


バックエンド・サーバーが追加されます。このとき、ポートが80になっていたら8080へ変更します。ORDSは、ポート番号は8080でHTTP接続を待ち受けるように構成されています。


ヘルス・チェック・ポリシーの指定に含まれるポート8080ステータス・コード302URLパス(URI)/ordsとします。バックエンドの通信はHTTPなので、SSLの使用チェックは入れません

へ進みます。


リスナー名は任意です。今回はlsnr-testservとしました。トラフィックのタイプHTTPSモニターするポートはデフォルトの443のままとします。

SSL証明書証明書リソースとして証明書サービス管理対象証明書を選択します。証明書として、先ほど作成したTestServを選択します。

へ進みます。


ロギングの管理は今回の検証の対象ではないため、エラー・ログアクセス・ログともにOFFにします。

以上で送信をクリックします。


ロード・バランサが作成されます。ロード・バランサに割り当てられたIPアドレス(パブリック)を確認します。


以上でOracle APEXに接続可能になっています。

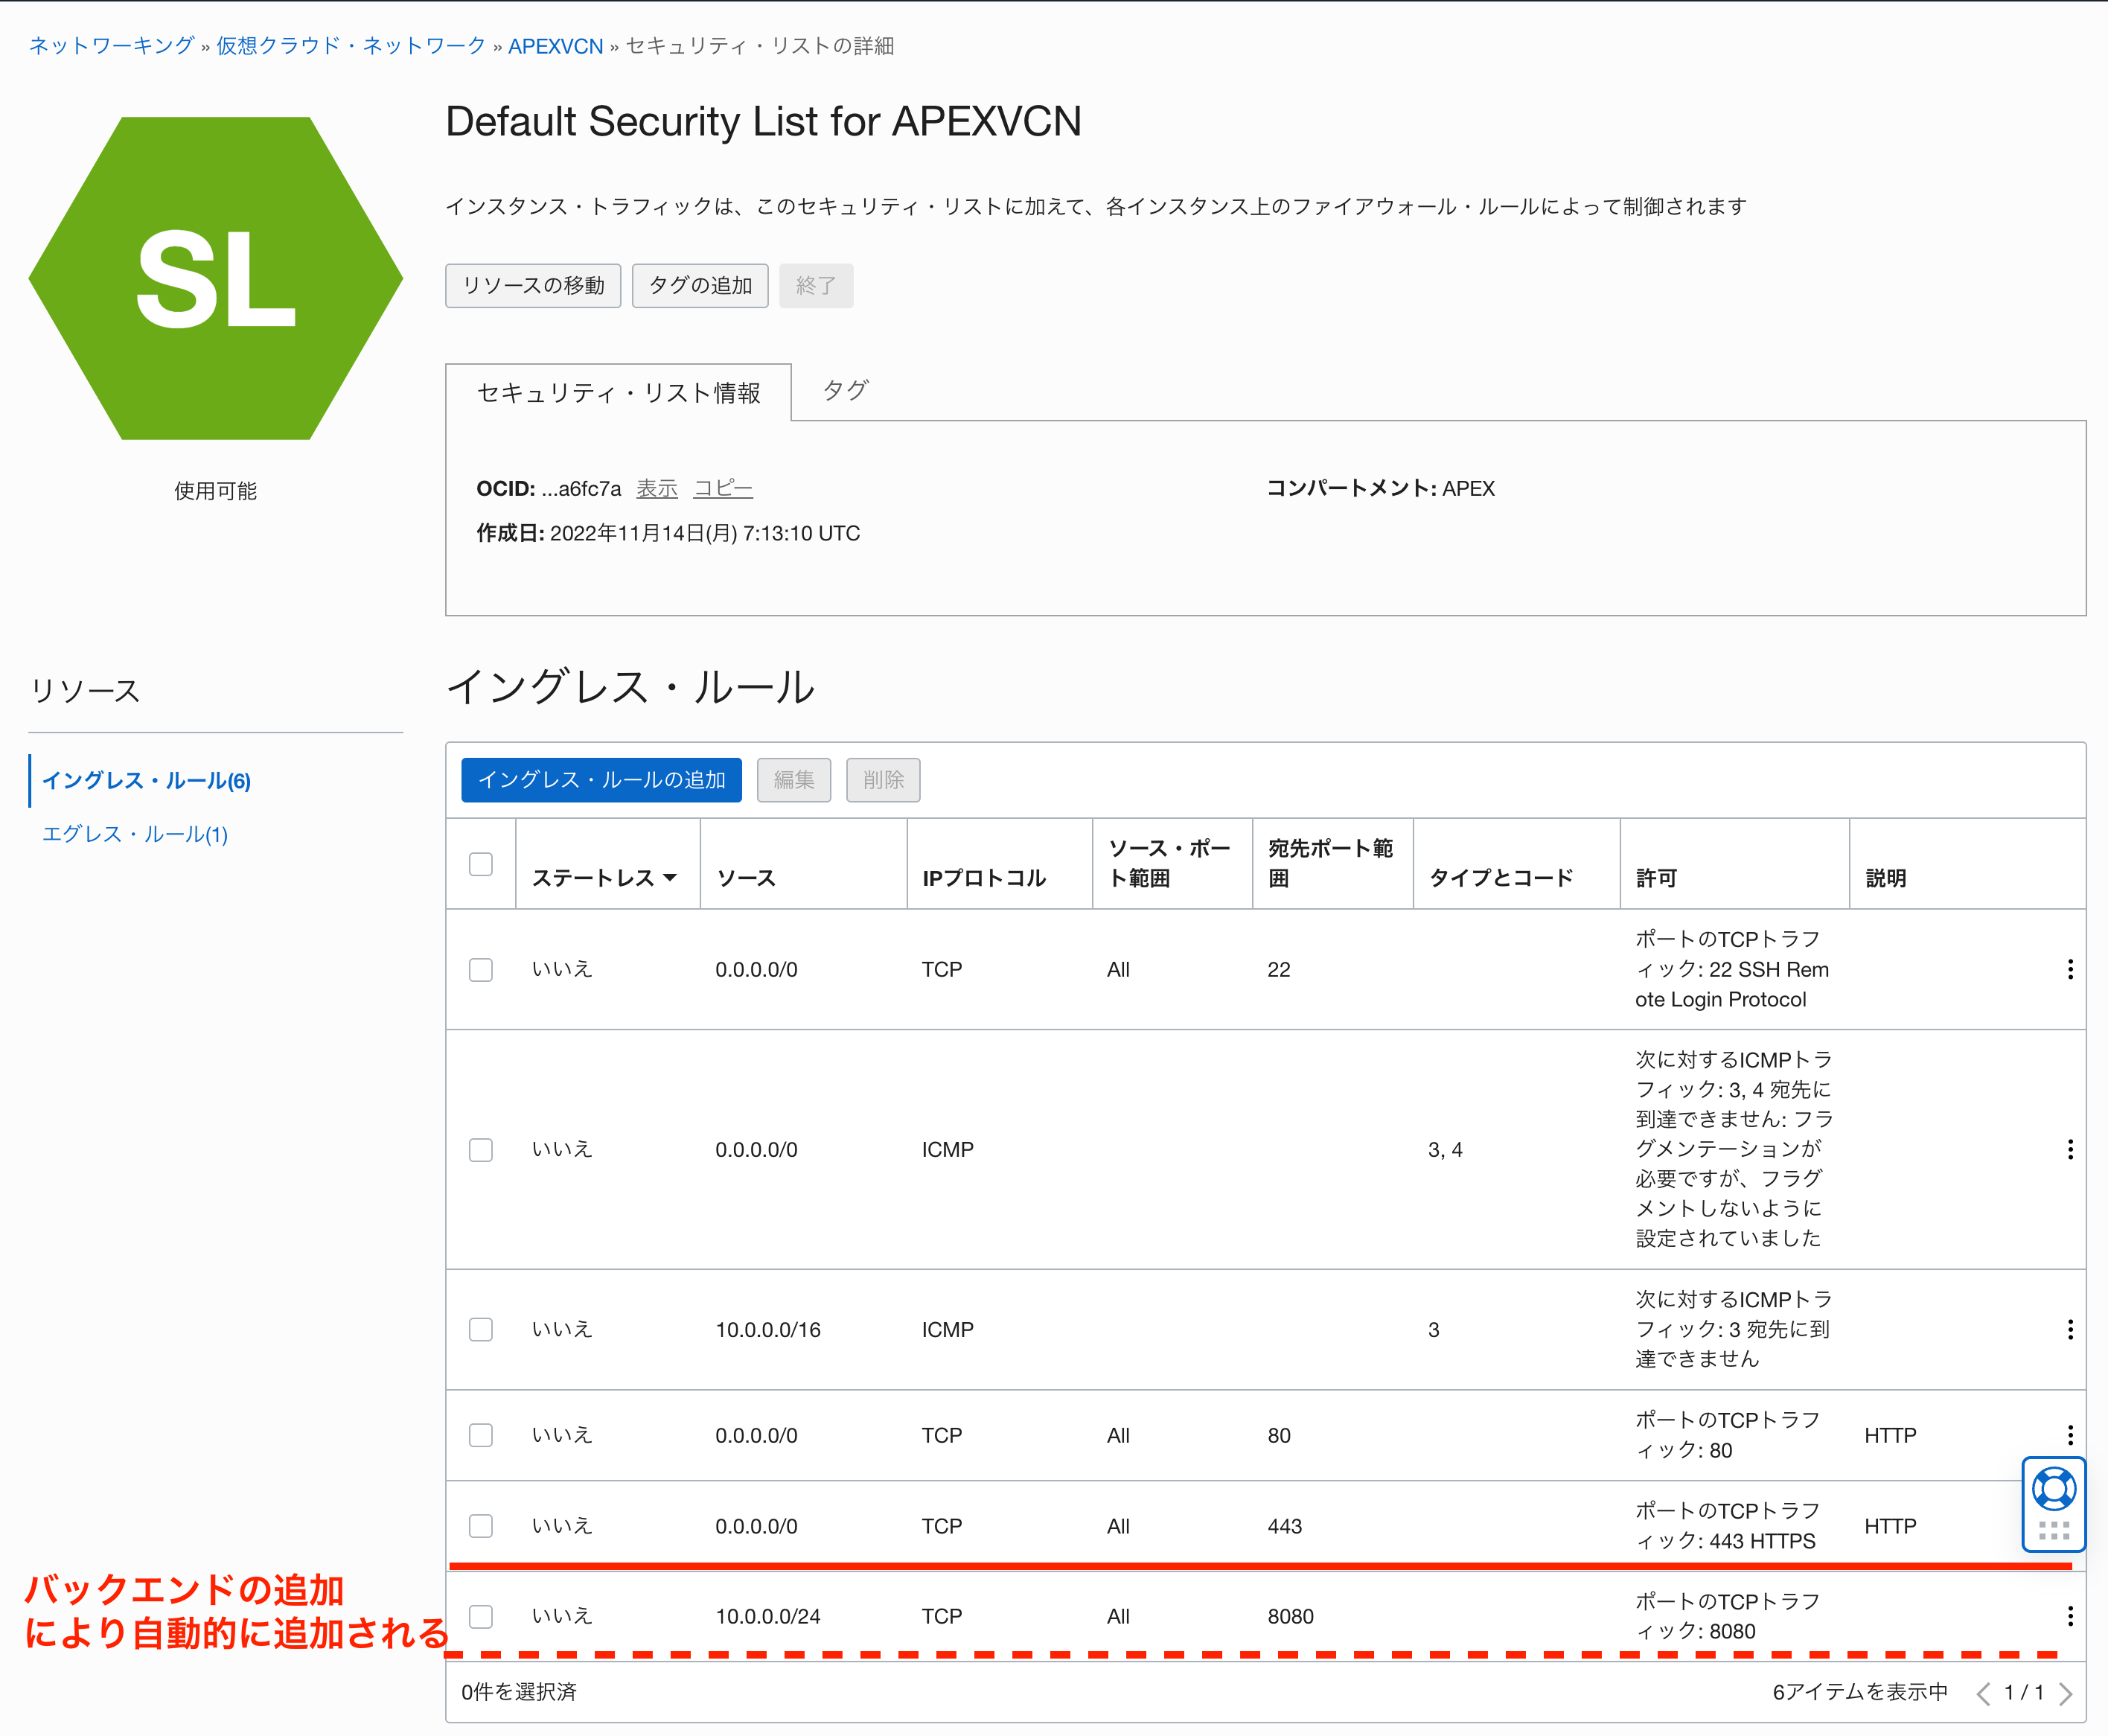
ロード・バランサへの接続を許可するため、ロード・バランサが配置されているネットワークにポート443への接続を許可するイングレス・ルールが設定済みであることを確認します。

ポート8080への接続を許可するイングレス・ルールは、ロード・バランサにバックエンドを追加したときに自動的に追加されます。


バックエンドの削除と追加を繰り返すと、同じイングレス・ルールが複数行になります。稼働に問題はありませんが、気になる場合は重複行を削除すると良いでしょう。


接続確認


作成した環境に接続します。/etc/hostsファイルまたはそれに準ずるファイルにパブリックIPアドレスとホスト名のペアを記述します。

IPアドレスはロード・バランサのパブリックIPアドレス、ホスト名は証明書の共通名またはSANとして設定したホスト名です。

129.***.***.218 testserv.******.dev


手元のPCに設定したホスト名にて、Oracle APEXの環境に接続します。

サーバー証明書の署名を行なっているCAは、プライベートCAであるため証明書に関するエラーが発生します。対応方法は、自己署名証明書を使用してHTTPS化したときと概ね同じです。

Oracle APEXの環境作成(10) - 自己署名証明書によるHTTPS化
http://apexugj.blogspot.com/2022/11/building-oracle-apex-environment-10-https.html

エラーが発生しているサーバー証明書を表示します。


自己署名証明のときと異なり複数の証明書が表示されます。一般に、後に表示されている証明書が上位の認証局の証明書になるため、その証明書をコピーしてPCに信頼できる証明書として登録します。


以上で、Oracle APEXの環境に接続できるようになります。


自己署名証明書の場合と異なり、一度、プライベートCAの証明書を登録すると、そのCAで署名されたサーバー証明書はすべて正しいサーバー証明書として扱われます。そのため、証明書をPCに登録する作業は、サーバーの数によらず一度で済みます。

ロード・バランサを構成しORDSの可用性を確保する(1) - サーバー証明書の発行

 Oracle Cloud Infrastructureの証明書サービスを使って、サーバー証明書を発行します。プライベートCAは構成済みとします。

OCIコンソールより証明書サービスを開き、証明書の作成を実行します。


証明書タイプとして内部CAによって発行済(英語ではIssued by internal CA - 内部CAによる発行)を選択します。名前TestServとします。へ進みます。


サブジェクト情報を設定します。

共通名(CN=で指定される項目 - Common Name)として、このサーバーをアクセスするURLに含まれるホスト名を入力します。サブジェクトの代替名というのはSAN(Subject Alternative Name)のことです。DNS名を選択し、共通名と同じホスト名を入力します。

へ進みます。


証明書構成を設定します。

証明書プロファイル・タイプとしてTLSサーバーを選択します。発行元認証局として作成済みのルートCAを選択します。有効期間の開始日空白(即時有効)とし、有効期間の終了日はデフォルトのまま変更しません。キー・アルゴリズムとしてRSA2048を選択し、へ進みます。


ルールを設定します。

更新ルール更新間隔(日数)はデフォルトの90日、拡張更新期間(日数)もデフォルトの30日から変更しません。

へ進みます。


サマリーが表示されます。証明書の作成をクリックします。


証明書が正常に作成されました。と表示されますが、正常に作成されたかどうかは証明書状態より確認する必要があります証明書詳細の表示をクリックします。


作成した証明書がアクティブであることを確認します。


以上で、ロード・バランサで使用する証明書の作成は完了です。

続く

ロード・バランサを構成しORDSの可用性を確保する(0) - 準備作業

 Oracle REST Data Servicesを実行する複数のコンピュート・インスタンスを用意し、ロード・バランサをフロントに配置することによって可用性を確保します。


前提条件


本来であればコンピュート・インスタンスはプライベート・ネットワークに配置すべきですが、プライベート・ネットワークを構成するにはアカウントをアップブレードする必要があります。アップグレードせずに構成手順を確認できるように、コンピュート・インスタンスはパブリック・ネットワークに配置します。

以下の記事に従ってCustomer Managed ORDSを構築済します。本記事に、手順として異なる部分を記載します。

Customer Managed ORDSの構成(1) - インストールと構成
また、ロード・バランサをHTTPS化するために使用するサーバー証明書は、Oracle Cloudの証明書サービスより発行します。プライベートCAの作成は、日本オラクル公式のチュートリアルを参考にしてください。

OCIチュートリアル - Oracle Cloud Infrastructureを使ってみよう
プライベート認証局と証明書の発行

Always FreeのデータベースとしてAPEXというインスタンスを作成し、Customer Managed ORDSを動作させるコンピュート・インスタンスとして、CMORDS1CMORDS2を作成済みとします。


Customer Managed ORDSの構築での変更点


Customer Managed ORDSはHTTPSではなくHTTPで接続するように構成します。そのため、CertbotのインストールやLet's Encryptを使った証明書の発行は行いません。

firewalldの構成では、ポート8080のみ接続を許可します。

firewall-cmd --add-port=8080/tcp
firewall-cmd --runtime-to-permanent
firewall-cmd --reload
firewall-cmd --list-all


[root@cmords1 ~]# firewall-cmd --add-port=8080/tcp

success

[root@cmords1 ~]# firewall-cmd --runtime-to-permanent

success

[root@cmords1 ~]# firewall-cmd --reload

success

[root@cmords1 ~]# firewall-cmd --list-all

public (active)

  target: default

  icmp-block-inversion: no

  interfaces: enp0s3

  sources: 

  services: ssh

  ports: 8080/tcp

  protocols: 

  forward: yes

  masquerade: no

  forward-ports: 

  source-ports: 

  icmp-blocks: 

  rich rules: 

[root@cmords1 ~]# 


ORDSを構成する際にはプロトコルとしてHTTPHTTPポートとしてデフォルトの8080を選択します。

  Enter a number to select the protocol

    [1] HTTP

    [2] HTTPS

  Choose [1]: 

  Enter the HTTP port [8080]: 


構成完了後に起動したORDSを停止し、/etc/ords/config/global/settings.xmlに以下の一行を追加します。

<entry key="security.httpsHeaderCheck">X-Forwarded-Proto: https</entry>

<?xml version="1.0" encoding="UTF-8"?>

<!DOCTYPE properties SYSTEM "http://java.sun.com/dtd/properties.dtd">

<properties>

<comment>Saved on Mon Nov 28 02:15:45 UTC 2022</comment>

<entry key="database.api.enabled">false</entry>

<entry key="standalone.context.path">/ords</entry>

<entry key="standalone.doc.root">/etc/ords/config/global/doc_root</entry>

<entry key="standalone.http.port">8080</entry>

<entry key="security.httpsHeaderCheck">X-Forwarded-Proto: https</entry>

</properties>


ロード・バランサのバックエンドとなるコンピュート・インスタンスそれぞれで、同じ作業を行います。

以上で事前準備は完了です。

続く

2022年11月25日金曜日

Customer Managed ORDSの構成(2) - Let's Encryptを使ったSSL化

更新: 2026年1月30日

自己署名証明書の代わりに、Let's Encryptによって発行された証明書に置き換えます。

DNSにコンピュート・インスタンスのホスト名とパブリックIPアドレスが登録され、どこからでもホスト名からIPアドレスが解決できる状態になっていることが前提条件です。


firewalldの構成


httpのサービスで接続できるようにします。

firewall-cmd --add-service=http
firewall-cmd --runtime-to-permanent
firewall-cmd --reload
firewall-cmd --list-all


ORDSを実装したコンピュート・インスタンスにログインし、ユーザーrootにて上記のコマンドを実行します。

[root@cmords-arm ~]# firewall-cmd --add-service=http

success

[root@cmords-arm ~]# firewall-cmd --runtime-to-permanent

success

[root@cmords-arm ~]# firewall-cmd --reload

success

[root@cmords-arm ~]# firewall-cmd --list-all

public (default, active)

  target: default

  ingress-priority: 0

  egress-priority: 0

  icmp-block-inversion: no

  interfaces: enp0s6

  sources: 

  services: dhcpv6-client http https ssh

  ports: 

  protocols: 

  forward: yes

  masquerade: no

  forward-ports: 

port=443:proto=tcp:toport=8443:toaddr=

  source-ports: 

  icmp-blocks: 

  rich rules: 

[root@cmords-arm ~]#


Certbotのインストール


Oracle CloudのOracle Linuxのインスタンスには、あらかじめEPELのリポジトリが設定されています。以下のコマンドを実行し、EPELのリポジトリを見つけます。

dnf repolist --all | grep EPEL

デフォルトではdisabledになっています。

[root@cmords-arm ~]# dnf repolist --all | grep EPEL

ol10_u0_developer_EPEL         Oracle Linux 10.0 EPEL Packages for Deve disabled

[root@cmords-arm ~]#


オンプレミスのOracle Linuxでは、パッケージepel-releaseをインストールするとEPELリポジトリが設定されます。

dnf -y install epel-release

見つかったEPELリポジトリをから、Certbotをインストールします。


dnf --enablerepo=ol10_u0_developer_EPEL -y install certbot


[root@cmords-arm ~]# dnf --enablerepo=ol10_u0_developer_EPEL -y install certbot

Oracle Linux 10.0 EPEL Packages for Development (aarch64)           35 MB/s | 5.9 MB     00:00    

Last metadata expiration check: 0:00:01 ago on Fri 30 Jan 2026 11:31:02 AM GMT.

Dependencies resolved.

===================================================================================================

 Package                     Arch        Version                 Repository                   Size

===================================================================================================

Installing:

 certbot                     noarch      4.2.0-1.el10_0          ol10_u0_developer_EPEL       75 k

Upgrading:

 python3-pyOpenSSL           noarch      25.0.0-1.el10_0         ol10_u0_developer_EPEL      155 k

Installing dependencies:

 fontawesome4-fonts          noarch      1:4.7.0-23.el10         ol10_appstream              208 k

 python3-acme                noarch      4.2.0-1.el10_0          ol10_u0_developer_EPEL      334 k

 python3-certbot             noarch      4.2.0-1.el10_0          ol10_u0_developer_EPEL      1.3 M

 python3-configargparse      noarch      1.7.1-1.el10_0          ol10_u0_developer_EPEL       67 k

 python3-josepy              noarch      2.0.0-2.el10_0          ol10_u0_developer_EPEL      116 k

 python3-parsedatetime       noarch      2.6-1.el10_0            ol10_u0_developer_EPEL      149 k

 python3-pyrfc3339           noarch      1.1-20.el10_0           ol10_u0_developer_EPEL       40 k


Transaction Summary

===================================================================================================

Install  8 Packages

Upgrade  1 Package


Total download size: 2.4 M

Downloading Packages:

(1/9): certbot-4.2.0-1.el10_0.noarch.rpm                           420 kB/s |  75 kB     00:00    

(2/9): python3-acme-4.2.0-1.el10_0.noarch.rpm                      1.5 MB/s | 334 kB     00:00    

(3/9): python3-configargparse-1.7.1-1.el10_0.noarch.rpm            998 kB/s |  67 kB     00:00    

(4/9): python3-parsedatetime-2.6-1.el10_0.noarch.rpm               9.5 MB/s | 149 kB     00:00    

(5/9): python3-pyrfc3339-1.1-20.el10_0.noarch.rpm                  3.5 MB/s |  40 kB     00:00    

(6/9): python3-josepy-2.0.0-2.el10_0.noarch.rpm                    1.7 MB/s | 116 kB     00:00    

(7/9): fontawesome4-fonts-4.7.0-23.el10.noarch.rpm                  12 MB/s | 208 kB     00:00    

(8/9): python3-pyOpenSSL-25.0.0-1.el10_0.noarch.rpm                1.3 MB/s | 155 kB     00:00    

(9/9): python3-certbot-4.2.0-1.el10_0.noarch.rpm                   2.8 MB/s | 1.3 MB     00:00    

---------------------------------------------------------------------------------------------------

Total                                                              5.2 MB/s | 2.4 MB     00:00     

Running transaction check

Transaction check succeeded.

Running transaction test

Transaction test succeeded.

Running transaction

  Preparing        :                                                                           1/1 

  Installing       : python3-pyrfc3339-1.1-20.el10_0.noarch                                   1/10 

  Installing       : python3-josepy-2.0.0-2.el10_0.noarch                                     2/10 

  Upgrading        : python3-pyOpenSSL-25.0.0-1.el10_0.noarch                                 3/10 

  Installing       : python3-acme-4.2.0-1.el10_0.noarch                                       4/10 

  Installing       : fontawesome4-fonts-1:4.7.0-23.el10.noarch                                5/10 

  Installing       : python3-parsedatetime-2.6-1.el10_0.noarch                                6/10 

  Installing       : python3-configargparse-1.7.1-1.el10_0.noarch                             7/10 

  Installing       : python3-certbot-4.2.0-1.el10_0.noarch                                    8/10 

  Installing       : certbot-4.2.0-1.el10_0.noarch                                            9/10 

  Running scriptlet: certbot-4.2.0-1.el10_0.noarch                                            9/10 

Created symlink '/etc/systemd/system/timers.target.wants/certbot-renew.timer' → '/usr/lib/systemd/system/certbot-renew.timer'.


Certbot auto renewal timer is not started by default.

Run 'systemctl start certbot-renew.timer' to enable automatic renewals.


  Cleanup          : python3-pyOpenSSL-24.2.1-1.0.1.el10.noarch                              10/10 

  Running scriptlet: python3-pyOpenSSL-24.2.1-1.0.1.el10.noarch                              10/10 


Upgraded:

  python3-pyOpenSSL-25.0.0-1.el10_0.noarch                                                         

Installed:

  certbot-4.2.0-1.el10_0.noarch                     fontawesome4-fonts-1:4.7.0-23.el10.noarch     

  python3-acme-4.2.0-1.el10_0.noarch                python3-certbot-4.2.0-1.el10_0.noarch         

  python3-configargparse-1.7.1-1.el10_0.noarch      python3-josepy-2.0.0-2.el10_0.noarch          

  python3-parsedatetime-2.6-1.el10_0.noarch         python3-pyrfc3339-1.1-20.el10_0.noarch        


Complete!

[root@cmords-arm ~]# 


Certbotのインストールは以上で完了です。


Let's Encryptからの証明書取得


Certbotを実行し、Let's Encryptにより署名されたサーバー証明書を取得します。

最初にホスト名からIPアドレスが解決できるか、hostコマンドを実行して確認します。

host ホスト名

ホスト名とIPアドレスの部分は、DNSに登録した値になります。

[root@cmords-arm ~]# host ホスト名

ホスト名 has address IPアドレス

[root@cmords-arm ~]#


certbotを実行し、証明書を取得します。ORDSで使用できる鍵タイプはRSAのみです。

certbot certonly --standalone --key-type rsa

最初に緊急のリニューアルとセキュリティに関する通知を受け取るメール・アドレスを入力します。

使用許諾について確認されるので、Yを入力します。

Electronic Frontier Foundationと入力したメール・アドレスを共有して良いかどうか聞かれるので、YまたはNのどちらかを入力します。

最後に証明書に含めるドメイン名(ホスト名)を聞かれるので、ホスト名を入力します。

以上を入力すると/etc/letsencrypt/live/ホスト名以下に、証明書チェーンとしてfullchain.pem、秘密キーのファイルとしてprivate.pemが作成されます。

/etc/letsencrypt/live/ホスト名/fullchain.pem
/etc/letsencrypt/live/ホスト名/privkey.pem


[root@cmords-arm ~]# certbot certonly --standalone --key-type rsa

Saving debug log to /var/log/letsencrypt/letsencrypt.log

Enter email address or hit Enter to skip.

 (Enter 'c' to cancel): メール・アドレス


- - - - - - - - - - - - - - - - - - - - - - - - - - - - - - - - - - - - - - - -

Please read the Terms of Service at:

https://letsencrypt.org/documents/LE-SA-v1.6-August-18-2025.pdf

You must agree in order to register with the ACME server. Do you agree?

- - - - - - - - - - - - - - - - - - - - - - - - - - - - - - - - - - - - - - - -

(Y)es/(N)o: Y


- - - - - - - - - - - - - - - - - - - - - - - - - - - - - - - - - - - - - - - -

Would you be willing, once your first certificate is successfully issued, to

share your email address with the Electronic Frontier Foundation, a founding

partner of the Let's Encrypt project and the non-profit organization that

develops Certbot? We'd like to send you email about our work encrypting the web,

EFF news, campaigns, and ways to support digital freedom.

- - - - - - - - - - - - - - - - - - - - - - - - - - - - - - - - - - - - - - - -

(Y)es/(N)o: N

Account registered.

Please enter the domain name(s) you would like on your certificate (comma and/or

space separated) (Enter 'c' to cancel): ホスト名

Requesting a certificate for ホスト名


Successfully received certificate.

Certificate is saved at: /etc/letsencrypt/live/ホスト名/fullchain.pem

Key is saved at:         /etc/letsencrypt/live/ホスト名/privkey.pem

This certificate expires on 2026-04-30.

These files will be updated when the certificate renews.

Certbot has set up a scheduled task to automatically renew this certificate in the background.


- - - - - - - - - - - - - - - - - - - - - - - - - - - - - - - - - - - - - - - -

If you like Certbot, please consider supporting our work by:

 * Donating to ISRG / Let's Encrypt:   https://letsencrypt.org/donate

 * Donating to EFF:                    https://eff.org/donate-le

- - - - - - - - - - - - - - - - - - - - - - - - - - - - - - - - - - - - - - - -

[root@cmords-arm ~]# 


ユーザーoracleがfullchain.pemおよびprivkey.pemを読めるように、ACLを設定します。

setfacl -m u:oracle:rx /etc/letsencrypt/live
setfacl -m u:oracle:rx /etc/letsencrypt/archive
setfacl -m u:oracle:r `readlink -f /etc/letsencrypt/live/ホスト名/privkey.pem`
getfacl /etc/letsencrypt/live
getfacl -R /etc/letsencrypt/archive


[root@cmords-arm ~]# setfacl -m u:oracle:rx /etc/letsencrypt/live

[root@cmords-arm ~]# setfacl -m u:oracle:rx /etc/letsencrypt/archive

[root@cmords-arm ~]# setfacl -m u:oracle:r `readlink -f /etc/letsencrypt/live/ホスト名/privkey.pem`

[root@cmords-arm ~]# getfacl /etc/letsencrypt/live

getfacl: Removing leading '/' from absolute path names

# file: etc/letsencrypt/live

# owner: root

# group: root

user::rwx

user:oracle:r-x

group::---

mask::r-x

other::---


[root@cmords-arm ~]# getfacl -R /etc/letsencrypt/archive

getfacl: Removing leading '/' from absolute path names

# file: etc/letsencrypt/archive

# owner: root

# group: root

user::rwx

user:oracle:r-x

group::---

mask::r-x

other::---


# file: etc/letsencrypt/archive/ホスト名

# owner: root

# group: root

user::rwx

group::r-x

other::r-x


# file: etc/letsencrypt/archive/ホスト名/cert1.pem

# owner: root

# group: root

user::rw-

group::r--

other::r--


# file: etc/letsencrypt/archive/ホスト名/privkey1.pem

# owner: root

# group: root

user::rw-

user:oracle:r--

group::---

mask::r--

other::---


# file: etc/letsencrypt/archive/ホスト名/chain1.pem

# owner: root

# group: root

user::rw-

group::r--

other::r--


# file: etc/letsencrypt/archive/ホスト名/fullchain1.pem

# owner: root

# group: root

user::rw-

group::r--

other::r--


[root@cmords-arm ~]#


ユーザーoracleでfullchain.pemとprivkey.pemが読めることを確認します。wc -lコマンドを実行し、行数をカウントします。

wc -l /etc/letsencrypt/live/ホスト名/fullchain.pem
wc -l /etc/letsencrypt/live/ホスト名/privkey.pem

[root@cmords-arm ~]# su - oracle

Last login: Fri Jan 30 12:01:38 GMT 2026 on pts/1

[oracle@cmords-arm ~]$ wc -l /etc/letsencrypt/live/ホスト名/fullchain.pem 

58 /etc/letsencrypt/live/ホスト名/fullchain.pem

[oracle@cmords-arm ~]$ wc -l /etc/letsencrypt/live/ホスト名/privkey.pem 

28 /etc/letsencrypt/live/ホスト名/privkey.pem

[oracle@cmords-arm ~]$ 


ORDSの構成変更


ユーザーoracleでORDSのプロパティstandalone.https.hoststandalone.https.certstandalone.https.cert.keyおよびstandalone.https.portを設定します。

cd /etc/ords/config
ords --config /etc/ords/config config set --global standalone.https.host ホスト名
ords --config /etc/ords/config config set --global standalone.https.cert /etc/letsencrypt/live/ホスト名/fullchain.pem
ords --config /etc/ords/config config set --global standalone.https.cert.key /etc/letsencrypt/live/ホスト名/privkey.pem
ords --config /etc/ords/config config set --global standalone.https.port 8443

[oracle@cmords-arm ~]$ cd /etc/ords/config

[oracle@cmords-arm config]$ ords --config /etc/ords/config config set --global standalone.https.host ホスト名


ORDS: Release 25.4 Production on Fri Jan 30 12:19:52 2026


Copyright (c) 2010, 2026, Oracle.


Configuration:

  /etc/ords/config


The global setting named: standalone.https.host was set to: ホスト名

[oracle@cmords-arm config]$ ords --config /etc/ords/config config set --global standalone.https.cert /etc/letsencrypt/live/ホスト名/fullchain.pem


ORDS: Release 25.4 Production on Fri Jan 30 12:20:33 2026


Copyright (c) 2010, 2026, Oracle.


Configuration:

  /etc/ords/config


The global setting named: standalone.https.cert was set to: /etc/letsencrypt/live/ホスト名/fullchain.pem

[oracle@cmords-arm config]$ ords --config /etc/ords/config config set --global standalone.https.cert.key /etc/letsencrypt/live/ホスト名/privkey.pem


ORDS: Release 25.4 Production on Fri Jan 30 12:21:01 2026


Copyright (c) 2010, 2026, Oracle.


Configuration:

  /etc/ords/config


The global setting named: standalone.https.cert.key was set to: /etc/letsencrypt/live/ホスト名/privkey.pem

[oracle@cmords-arm config]$ ords --config /etc/ords/config config set --global standalone.https.port 8443


ORDS: Release 25.4 Production on Fri Jan 30 12:58:42 2026


Copyright (c) 2010, 2026, Oracle.


Configuration:

  /etc/ords/config


No updates required to setting named standalone.https.port in global configuration because the values are the same.

[oracle@cmords-arm config]$ 


rootユーザーに戻り、変更を反映させるためにORDSを再起動します。

systemctl restart ords

[root@cmords-arm ~]# systemctl restart ords

[root@cmords-arm ~]# 


以上でLet's Encryptにて発行されたサーバー証明書を使うようになりました。

Hostsファイルに残っているエントリがあれば削除します。また、自己署名証明書が手元のPCに信頼する証明書として登録されたままであれば、それも削除しておきます。