2025年2月7日金曜日

Oracle DevelopersのYouTubeのOracle APEX Graph Visualization Plug-in Enhancementの実装を試してみる

YouTubeのチャンネルにOracle Developersがあります。そのチャンネルに以下の動画が投稿されています。

Oracle APEX Graph Visualization Plug-in Enhancement - Drill Down into Details

APEX Graph Visualization Plug-inはOracle Graphの開発チームより提供されている、APEXのアプリケーションに組み込めるグラフを表示するプラグインです。この動画では、グラフ・プラグインに表示されているノードのツールチップ上に、APEXアプリケーションのページを開くボタンを作る方法を解説しています。

本記事では、この動画の内容にそって、Graph Visualization Plug-inのサンプル・アプリケーションに、ページを開くボタンを追加します。

以前にGraph Visualization Plug-inのサンプル・アプリケーションの導入方法を紹介しています。記事「Graph Visualization Plug-inのサンプル・アプリケーションをOracle Database 23aiのAPEXにインストールする」です。こちらの記事ではOracle APEX 24.1のサンプル・アプリケーションのブランチを参照しています。今回のYouTubeの動画では24.2のブランチを参照しています。


インストールするファイルsample-graph-visualizations_23ai.sqlgvt_sqlgraph_to_json.sqlを24.1と24.2で比較しましたが、実質的には同一(コメントが1行違う)でした。そのため、この記事の手順に従ってGraph Visualization Plug-inのサンプル・アプリケーションを準備します。

Oracle Database 23ai FreeにOracle APEX 24.2の組み合わせで、サンプル・アプリケーションにドロワーの表示を組み込んでみます。

追加した機能は以下のGIF動画のように動作します。


先に紹介した記事の作業を行い、Sample Graph Visualizationsのアプリケーションが作成済みであることを前提とします。

ドロワーを開く機能は、Interactionのページに実装します。


グラフに表示されているノード上で右クリックすると、ツールチップが表示されます。このツールチップ上にボタンを追加します。


最初に従業員をドロワーとして表示するページを作成します。

アプリケーション・デザイナよりページの作成をクリックします。


フォームを選択します。


ページの名前Employee Detailとし、ページ・モードドロワーを選択します。データ・ソース表/ビューの名前に、EBA_GRAPHVIZ_EMPLOYEESを指定します。この表はサンプル・アプリケーションのインストール時に、サポートするオブジェクトとしてデータベースにインストールされます。

へ進みます。


主キー列1EMPLOYEE_ID(Number)になります。

ページの作成をクリックします。


ドロワーのページが作成されます。

ページ・プロパティ識別別名を確認します。通常はページ名がEmployee Detailであれば別名はemployee-detailになります。この値をAPEX_PAGE.GET_URLの引数p_pageに与えます。


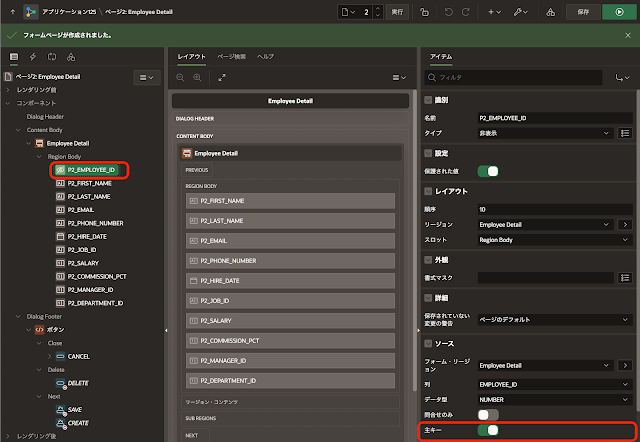
ページ・アイテムP2_EMPLOYEE_ID主キーオンであることを確認します。


以上でドロワーのページは完成です。

静的アプリケーション・ファイルとして、今回の機能拡張を実装したJavaScriptファイルを作成します。

セミナー講師が準備したGitHubリポジトリより、graphDrillDown.jsgraphDrillDownPageLoad.jsの内容を組み込みます。


上記のファイルとほとんど同じですが、graphDrillDownPageLoad.jsの内容をDOMContentLoadedのイベントで実行するようにして、graphDrillDown.jsに追加しました。

それとgraphDrillDown.jsの68行目の以下の行を、

window.location.href = response.url; // uncomment this line to enable redirection

APEXのドロワーを開く、以下のコードに変更しています。

apex.navigation.dialog(response.url, {} );

このファイルを静的アプリケーション・ファイルとして作成します。

// global variable declaration
// define the icon class to be used for the button icon
// change the value to customize the icon (reference: oracle icon gallery)
const iconClass = "oj-ux-ico-arrow-circle-down";
// define the key identifier for extracting the required value from the tooltip. What element will the getKeyValue search for?
const keyIdentifier = "EMPLOYEE_ID";
// reference the name of the apex ajax callback process that will handle the request
const ajaxCallback = "REDIRECT_USER";
// button label and title
const buttonTitle = "Drill Down - View Details";
// (leave unchanged) selector string to identify the tooltip modal in the DOM
const toolTipQuerySelector = 'section.ovis.oj-popup.svelte-1wc7iob';
// function to add a button to the tooltip footer
function addButtonToTooltip(toolTip) {
//console.log('Button Added to ToolTip');
if (buttonAdded) return; // prevent adding multiple buttons
// create the button and append it to the tooltip footer
const button = createButton();
toolTip.querySelector('footer').appendChild(button);
// attach a click event listener to handle button click
button.addEventListener('click', () => handleButtonClick(toolTip));
}
// function to create a styled button element
function createButton() {
//console.log('Button Created');
// create a div element and apply oracle jet (oj) button classes
const button = document.createElement('div');
button.classList.add('oj-button', 'normal', 'oj-button-half-chrome', 'oj-button-icon-only', 'oj-complete', 'svelte-16rn59g', 'oj-default', 'oj-enabled');
// define the inner html structure with an icon
button.innerHTML = `
<button class="oj-button-button" aria-label="${buttonTitle}" title="${buttonTitle}">
<div class="oj-button-label">
<span class="oj-button-icon oj-start oj-ux-icon ${iconClass}"></span>
</div>
</button>
`;
return button;
}
// function to handle the user's button click event
async function handleButtonClick(toolTip) {
// retrieve the key value from the tooltip (e.g., employee id)
const keyValue = getKeyValue(toolTip);
// if no key value is found, alert a message and exit the function
if (!keyValue) {
apex.message.showErrors( [
{
type: "error",
location: [ "page"],
message: `Key "${keyIdentifier}" not found in tooltip. Ensure it is declared in the keyIdentifier constant.`,
unsafe: false
}
] );
return;
}
//console.log(`${keyIdentifier} = value:`, keyValue);
try {
// send an asynchronous ajax request to the oracle apex server
const response = await apex.server.process(ajaxCallback, {
x01: keyValue // send the extracted key value as parameter x01
}, { dataType: 'JSON' }); // expect a json response
//console.log('server response:', response);
// check if the server response contains a url to redirect the user
if (response.url) {
// window.location.href = response.url; // uncomment this line to enable redirection
apex.navigation.dialog(response.url, {} );
}
// check if the server returned an error message
else if (response.error) {
apex.message.showErrors( [
{
type: "error",
location: [ "page"],
message: `An error occurred during the AJAX request.Server Error: ${response.error}`,
unsafe: false
}
] ); // show an alert with the error message
}
} catch (error) {
// handle any errors that occur during the ajax request
console.error('ajax request failed:', error);
apex.message.showErrors([
{
type: "error",
location: ["page"],
message: "An error occurred during the AJAX request.",
unsafe: false
}
]); // display an error alert
}
}
// function to extract the key value from the tooltip table
function getKeyValue(toolTip) {
// find the row where the key identifier is located
const keyValueRow = Array.from(toolTip.querySelectorAll('tr')).find(row => {
const labelCell = row.querySelector('td b');
return labelCell && labelCell.textContent.trim() === keyIdentifier;
});
if (keyValueRow) {
// retrieve the corresponding value from the second cell in the row. i.e the value for that identifier
const keyValueCell = keyValueRow.querySelectorAll('td')[1];
return keyValueCell ? keyValueCell.textContent.trim() : null;
}
return null; // return null if the key value is not found
}
/*
* graphDrillDownPageLoad.jsの内容。
*/
document.addEventListener("DOMContentLoaded", function () {
// create a new mutation observer to monitor changes in the DOM reference:https://developer.mozilla.org/en-US/docs/Web/API/MutationObserver
const observer = new MutationObserver((mutationsList) => {
// iterate through all observed mutations
for (const mutation of mutationsList) {
// check if the mutation type is 'childList', meaning elements were added or removed
if (mutation.type === 'childList') {
// attempt to find the tooltip (modal) in the DOM
const toolTip = document.querySelector(toolTipQuerySelector);
if (toolTip) {
addButtonToTooltip(toolTip); // call function to add the button
} else {
buttonAdded = false; // reset flag when tooltip is removed or closed
}
}
}
});
// start observing the body element for child node changes (added or removed elements)
observer.observe(document.body, {
childList: true, // watch for direct additions or removals of child elements
subtree: false // do not monitor changes deep within child elements
});
});
共有コンポーネント静的アプリケーション・ファイルを開きます。


ファイルの作成をクリックします。


ディクレクトリjsファイル名graphDrillDown.jsとします。

作成をクリックします。


本記事に掲載したgraphDrillDown.jsのコードを貼り付け、変更の保存をクリックします。


ファイルが保存され、縮小されました。とメッセージが表示されます。参照をコピーします。この参照の値をページ・プロパティJavaScriptファイルURLに設定します。

取消をクリックし、スクリプト・エディタを閉じます。


ページ・デザイナに戻り、ページ・プロパティJavaScriptファイルURLに以下の値を設定します。

[defer]#APP_FILES#js/graphDrillDown#MIN#.js


ドロワーのページを開くURLを取得するために呼び出すAjaxコールバックを作成します。

名前REDIRECT_USERとします。この名前はgraphDrillDown.jsの定数ajaxCallbackに設定されているため、変更する場合はgraphDrillDown.jsも変更が必要です。

こちらのコードは元の動画のコードより、かなり簡素化しています。

DECLARE
-- variable to store the final redirect url
l_url VARCHAR2(32767);
BEGIN
/*
* p_pageに開くページのページ名、p_itemsに主キーのアイテム名を指定する。
*/
l_url := apex_page.get_url(
p_page => 'employee-detail'
,p_items => 'P2_EMPLOYEE_ID'
,p_values => APEX_APPLICATION.G_X01
);
-- return the generated url as a json response
apex_json.open_object;
apex_json.write('url', l_url);
apex_json.close_object;
EXCEPTION
-- handle any unexpected errors and return an error message in json format
WHEN OTHERS THEN
apex_debug.message('Error! ' || SQLERRM); -- log error for debugging
apex_json.open_object;
apex_json.write('error', 'an error occurred: ' || SQLERRM);
apex_json.close_object;
END;


以上でアプリケーションは完成です。アプリケーションを実行すると、記事の先頭のGIF動画のように、ツールチップからドロワーを開くことができます。

開いたページはドロワーなので、ドロワーを閉じたときにダイアログ・クローズのイベントが発生します。

Graph Visualization Plug-inのリージョンに静的IDとして、例えばGRAPHVIZを設定します。


URLの取得時に呼び出すAPEX_PAGE.GET_URLの引数p_triggering_elementに、上記の静的IDをセレクタとした#GRAPHVIZを渡すと、ダイアログのクローズ時に動的アクションを実行できます。
    /*
    * p_pageに開くページのページ名、p_itemsに主キーのアイテム名を指定する。
    */
    l_url := apex_page.get_url(
        p_page => 'employee-detail'
        ,p_items => 'P2_EMPLOYEE_ID'
        ,p_values => APEX_APPLICATION.G_X01
        ,p_triggering_element => '#GRAPHVIZ'
    );
しかし、Graph Visualization Plug-inにはリージョンをリフレッシュするメソッドが未実装(に見える)なため、ダイアログ・クローズにイベントを受け取ってもグラフを更新できません。

操作感は良くありませんが、リージョンをリフレッシュする代わりにwindow.location.reload()を呼び出すことで、グラフを更新することができます。


今回の記事は以上になります。

今回作成したAPEXアプリケーションのエクスポートを以下に置きました。
https://github.com/ujnak/apexapps/blob/master/exports/sample-graph-visualization-with-drilldown.zip

Oracle APEXのアプリケーション作成の参考になれば幸いです。