HTMLのページに表示した画像に重ねて矩形を描画する、いくつかの異なった方法がありました。それぞれの実装方法を後で参照できるように、ひとつのAPEXアプリケーションにまとめました。
以下の3つの方法を実装しています。
- 画像をキャンバスに描画し、そのキャンバスに矩形を描画する。
- 画像にキャンバスを重ねて、そのキャンバスに矩形を描画する。
- 画像に矩形を表示するDIV要素を重ねる。
作成したアプリケーションは以下のように動作します。それぞれの異なる処理を実装していますが、見た目はほぼ同じです。
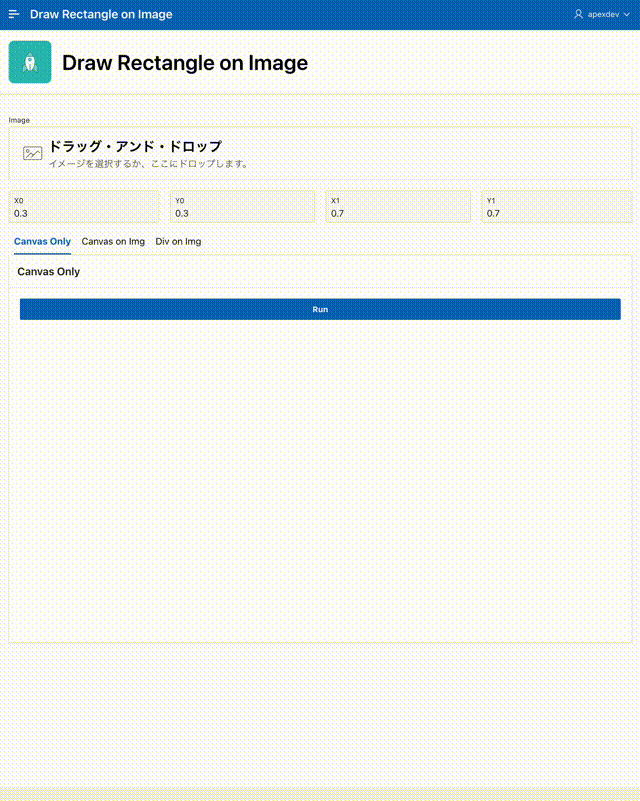
作成したアプリケーションのエクスポートを以下に置きました。
https://github.com/ujnak/apexapps/blob/master/exports/draw-rectangle-on-image.zip
アプリケーションはすべてホーム・ページに実装しています。
DIV要素でバウンディング・ボックスとなる矩形を表示するため、ページ・プロパティのCSSのインラインに以下を記述します。
This file contains bidirectional Unicode text that may be interpreted or compiled differently than what appears below. To review, open the file in an editor that reveals hidden Unicode characters.
Learn more about bidirectional Unicode characters
.bounding-box { | |
border-color: #0F0; | |
position: absolute; | |
box-sizing: border-box; | |
border-width: 2px; | |
border-style: solid; | |
} | |
.bounding-box-label { | |
color: black; | |
background-color: #0F0; | |
position: absolute; | |
top: 0; | |
left: 0; | |
font-size: 12px; | |
padding: 1px; | |
} |
画像の選択にはページ・アイテムP1_IMAGEを使います。タイプはイメージ・アップロードです。これは、実質的にはtype="file"のINPUT要素になります。表示形式としてネイティブ・ファイル参照が選択されている場合はINPUT要素がそのまま生成されますが、その他の表示形式ではカスタム要素が生成されます。しかし表示形式に関わらず、ページ・アイテムの要素からfiles(の配列)属性を参照することができます。
ページ・アイテムP1_X0、P1_X1、P1_Y0、P1_Y1で描画する矩形の座標を設定します。
それぞれ0から1の間の数値を指定します。
画像をキャンバスに描画し、そのキャンバスに矩形を描画する。
描画の対象は、静的コンテンツのリージョンCONTAINER_CANVAS_ONLYに以下のように設定します。
<canvas id="canvas-only" class="w100p"><canvas/>
ボタンRunをクリックしたときに実行するJavaScriptのコードは以下です。
This file contains bidirectional Unicode text that may be interpreted or compiled differently than what appears below. To review, open the file in an editor that reveals hidden Unicode characters.
Learn more about bidirectional Unicode characters
/* | |
* ページ・アイテムP1_IMAGEに選択された画像のURLを取り出す。 | |
*/ | |
const imageFile = document.getElementById("P1_IMAGE").files[0]; | |
const imageUrl = URL.createObjectURL(imageFile); | |
const img = new Image(); | |
/* | |
* Canvas要素への画像の描画に続き、矩形を描画する。 | |
*/ | |
img.onload = () => { | |
// 画像の描画 | |
const canvas = document.getElementById("canvas-only"); | |
const ctx = canvas.getContext("2d"); | |
ctx.clearRect(0, 0, canvas.width, canvas.height); | |
canvas.height = Math.ceil(img.height * ( canvas.width / img.width )); | |
// 解像度を上げる。 | |
const dpr = window.devicePixelRatio; | |
const cw = canvas.width; | |
const ch = canvas.height; | |
canvas.width = cw * dpr; | |
canvas.height = ch * dpr; | |
// canvasに設定した自動スケールに任せる。 | |
// ctx.scale(dpr, dpr); | |
// 画像の描画 | |
ctx.drawImage(img, 0, 0, canvas.width, canvas.height); | |
// 矩形の描画 | |
const x0 = Number(apex.items.P1_X0.value); | |
const y0 = Number(apex.items.P1_Y0.value); | |
const x1 = Number(apex.items.P1_X1.value); | |
const y1 = Number(apex.items.P1_Y1.value); | |
const startX = x0 * canvas.width; | |
const startY = y0 * canvas.height; | |
const width = (x1 - x0) * canvas.width; | |
const height = (y1 - y0) * canvas.height; | |
ctx.strokeStyle = "#0F0"; | |
ctx.lineWidth = 4; | |
ctx.strokeRect(startX, startY, width, height); | |
} | |
/* | |
* ページ・アイテムに選択されている画像を読み込む。 | |
*/ | |
img.src = imageUrl; |
画像にキャンバスを重ねて、そのキャンバスに矩形を描画する。
描画の対象は、静的コンテンツのリージョンCONTAINER_CANVAS_ON_IMGに以下のように設定します。
<div style="position: relative;" class="w100p">
<img id="canvas-on-img-image" src="" width="100%" />
<canvas id="canvas-on-img-canvas" style="position: absolute; left: 0; "></canvas>
</div>
ボタンRunをクリックしたときに実行するJavaScriptのコードは以下です。
This file contains bidirectional Unicode text that may be interpreted or compiled differently than what appears below. To review, open the file in an editor that reveals hidden Unicode characters.
Learn more about bidirectional Unicode characters
/* | |
* ページ・アイテムP1_IMAGEに選択された画像をIMG要素に描画する。 | |
*/ | |
const imageFile = document.getElementById("P1_IMAGE").files[0]; | |
const imageUrl = URL.createObjectURL(imageFile); | |
const img = document.getElementById("canvas-on-img-image"); | |
/* | |
* IMG要素に画像が表示された後にCANVAS要素に矩形を描画する。 | |
*/ | |
img.onload = () => { | |
const x0 = Number(apex.items.P1_X0.value); | |
const y0 = Number(apex.items.P1_Y0.value); | |
const x1 = Number(apex.items.P1_X1.value); | |
const y1 = Number(apex.items.P1_Y1.value); | |
const canvas = document.getElementById("canvas-on-img-canvas"); | |
const imgWidth = img.width; | |
const imgHeight = img.height; | |
canvas.width = imgWidth; | |
canvas.height = imgHeight; | |
const startX = x0 * imgWidth; | |
const startY = y0 * imgHeight; | |
const width = (x1 - x0) * imgWidth; | |
const height = (y1 - y0) * imgHeight; | |
const ctx = canvas.getContext('2d'); | |
ctx.strokeStyle = '#0F0'; | |
ctx.lineWidth = 4; | |
ctx.globalCompositeOperation = 'destination-over'; | |
ctx.strokeRect(startX, startY, width, height); | |
// キャプションの印刷 | |
ctx.globalCompositeOperation = 'source-over'; | |
ctx.fillStyle = '#0F0'; | |
ctx.font = "12px sans-serif"; 1 | |
ctx.textBaseline = "top"; | |
const textHeight = 12; | |
const textPad = 2; | |
const label = "サンプルのラベル"; | |
const textWidth = ctx.measureText(label).width; | |
ctx.fillRect( | |
startX, | |
startY, | |
textWidth + textPad, | |
textHeight + textPad | |
); | |
ctx.fillStyle = '#000000'; | |
ctx.fillText( label, startX, startY ); | |
} | |
/* | |
* ページ・アイテムに選択されている画像を読み込む。 | |
*/ | |
img.src = imageUrl; |
画像に矩形を表示するDIV要素を重ねる。
描画の対象は、静的コンテンツのリージョンCONTAINER_DIV_ON_IMGに以下のように設定します。
<div id="image-container" class="w100p">
<img id="image" src="" width="100%"></img>
</div>
ボタンRunをクリックしたときに実行するJavaScriptのコードは以下です。
This file contains bidirectional Unicode text that may be interpreted or compiled differently than what appears below. To review, open the file in an editor that reveals hidden Unicode characters.
Learn more about bidirectional Unicode characters
/* | |
* ページ・アイテムP1_IMAGEに選択された画像をIMG要素に描画する。 | |
*/ | |
const imageFile = document.getElementById("P1_IMAGE").files[0]; | |
const imageUrl = URL.createObjectURL(imageFile); | |
const imageContainer = document.getElementById("image-container"); | |
const img = document.getElementById("image"); | |
/* | |
* IMG要素に画像が表示された後にCANVAS要素に矩形を描画する。 | |
*/ | |
img.onload = () => { | |
const x0 = Number(apex.items.P1_X0.value); | |
const y0 = Number(apex.items.P1_Y0.value); | |
const x1 = Number(apex.items.P1_X1.value); | |
const y1 = Number(apex.items.P1_Y1.value); | |
// 描画する矩形を定義する。 | |
const boxElement = document.createElement("div"); | |
boxElement.className = "bounding-box"; | |
Object.assign(boxElement.style, { | |
left: 100 * x0 + '%', | |
top: 100 * y0 + '%', | |
width: 100 * (x1 - x0) + '%', | |
height: 100 * (y1 - y0) + '%', | |
}); | |
// 描画する矩形の左上にラベルをつける。 | |
const labelElement = document.createElement('span'); | |
labelElement.textContent = 'サンプルのラベル'; | |
labelElement.className = 'bounding-box-label'; | |
boxElement.appendChild(labelElement); | |
// 矩形を描画する。 | |
imageContainer.appendChild(boxElement); | |
} | |
/* | |
* ページ・アイテムに選択されている画像を読み込む。 | |
*/ | |
img.src = imageUrl; |
注意点
IMG要素にDIV要素を重ねて矩形を表示する際に、親となるリージョンのテンプレート・オプションでマージンが設定されていると、矩形を描画する位置にズレが生じました。
本来、矩形の描画を指定した位置は以下です。
画像を含むリージョン(今回の実装ではCONTAINER_DIV_ON_IMG)のテンプレート・オプションにて、Top MarginとLeft MarginにLargeを設定します。
画像および矩形の表示は以下のように変わり、意図した位置からズレて矩形が描画されます。
比較対象がないと見つかりにくい現象ではないかと思います。
今回の記事は以上になります。
Oracle APEXのアプリケーション作成の参考になれば幸いです。
完