2024年12月20日金曜日

ブラウザで動くPoint Cloud Library(PCL)のpcl.jsをOracle APEXに組み込む

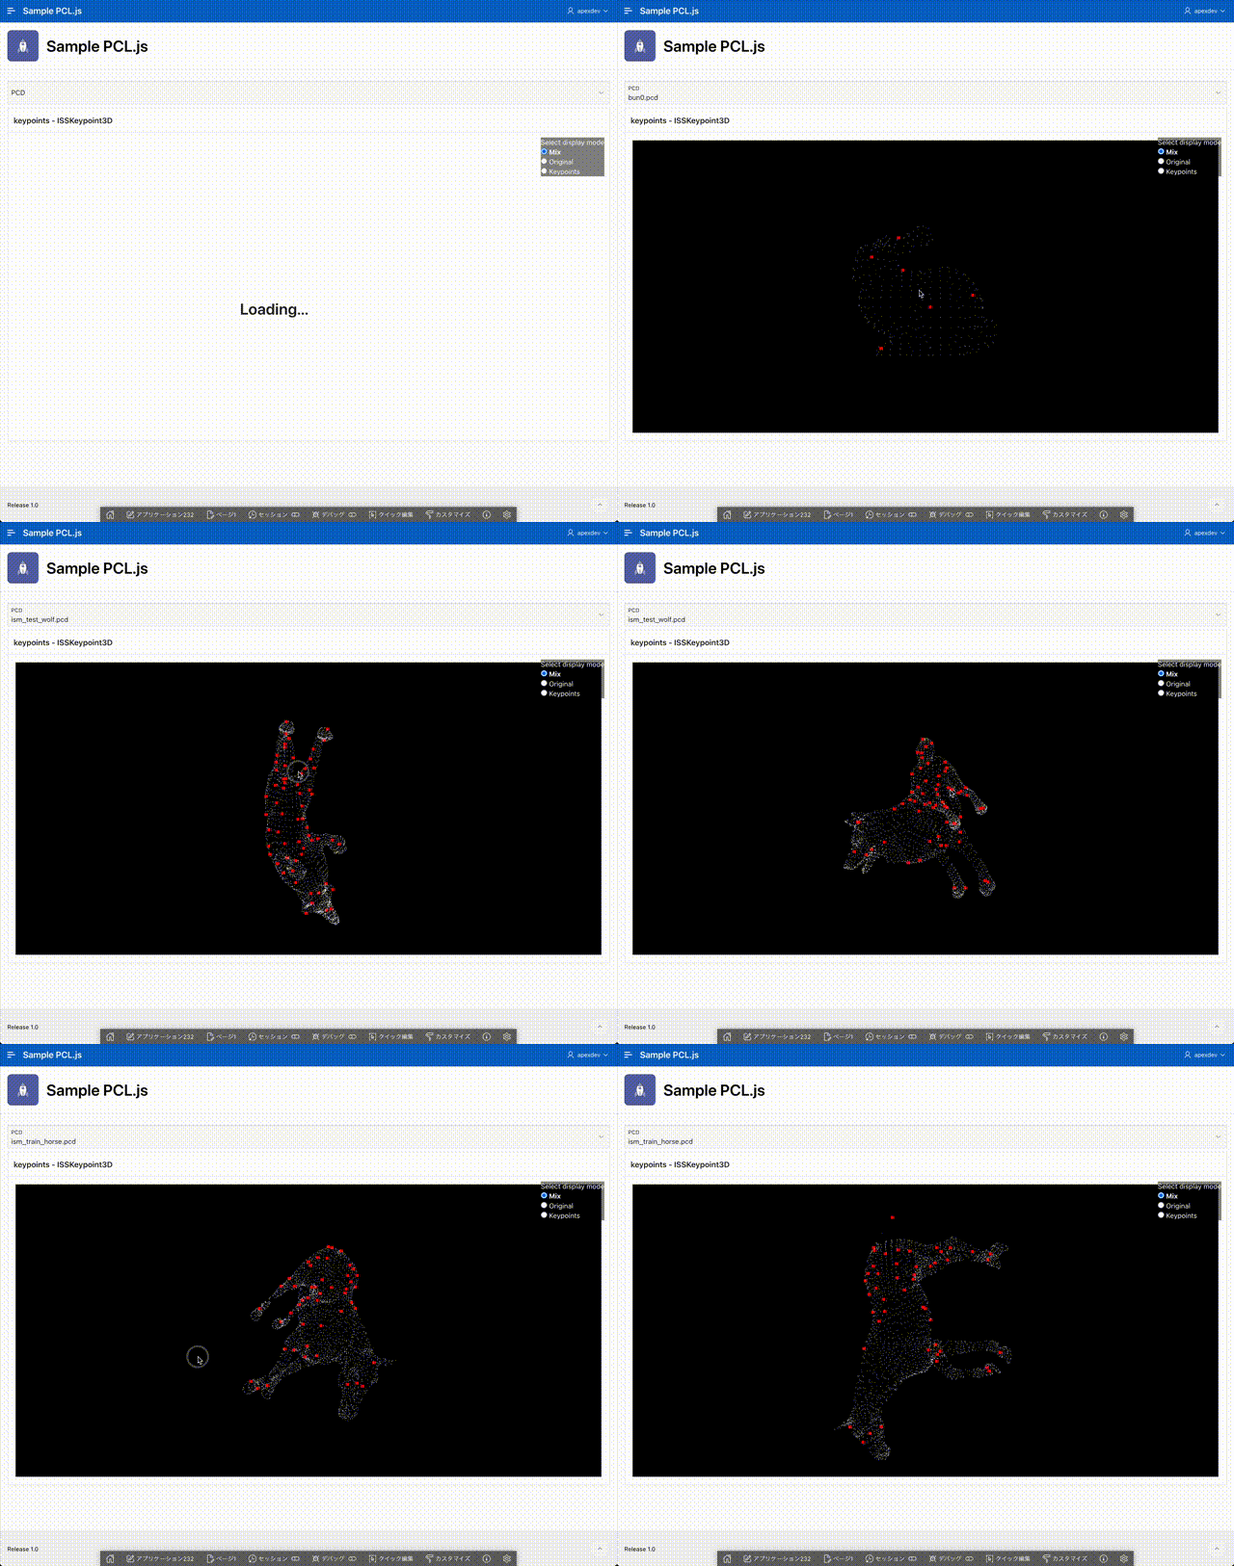
プラウザで動くPoint Cloud Library(PCL)のpcl.jsをOracle APEXのアプリケーションに組み込みます。 pcl.jsのExamplesにあるExtract point cloud keypoints using ISSKeypoint3Dを実行するAPEXアプリケーションを作成します。

作成したAPEXアプリケーションは以下のように動作します。


pcl.jsのExamplesは、CodeSandboxのサービスで開いてコードやデータの参照、修正ができるようになっています。

CodeSandboxでExampleのpcl.js-ISSKeypoint3Dを開き、含まれているファイルを手元にダウンロードします。

JavaScriptのコードindex.jsに記述されていてます。これはほぼそのまま、APEXのアプリケーションでも使用します。pcl.jsの描画領域はindex.htmlにHTMLとして記載されています。この一部を、APEXのページのリージョンに静的コンテンツとして埋め込みます。Point Cloud Dataであるbun0.pcd(兎)、ism_test_wolf.pcd(狼)、ism_train_horse.pcd(馬)のファイルは、静的アプリケーション・ファイルとしてアップロードします。


空のAPEXアプリケーションを作成します。名前Sample PCL.jsとしました。すべての機能は、デフォルトで作成されるホーム・ページに実装します。

最初に共有コンポーネント静的アプリケーション・ファイルとして、bun0.pcdism_test_wolf.pcdism_train_horse.pcdをアップロードします。アップロードが完了すると、以下のように静的アプリケーション・ファイルの一覧に表示されます。


ホーム・ページのページ・プロパティHTMLヘッダーに以下を記述します。pcl.jsはPoint Cloud Dataの処理結果の表示にThreeJSを使いますが、OrbitControlsやPCDLoaderといったクラスのどれを使うか記載しているドキュメントは見つけられませんでした。そのため、ファイルが参照できない、というエラーを確認して、ひとつひとつimportmapの設定を追加しています。
<script type="importmap">
    {
        "imports": {
            "pcl.js": "https://cdn.jsdelivr.net/npm/pcl.js@1.16.0/dist/pcl.esm.js",
            "pcl.js/PointCloudViewer": "https://cdn.jsdelivr.net/npm/pcl.js@1.16.0/dist/visualization/PointCloudViewer.esm.js",
            "three": "https://cdn.jsdelivr.net/npm/three@0.171.0/build/three.module.js",
            "three/examples/jsm/controls/OrbitControls": "https://cdn.jsdelivr.net/npm/three@0.171.0/examples/jsm/controls/OrbitControls.js",
            "three/examples/jsm/loaders/PCDLoader": "https://cdn.jsdelivr.net/npm/three@0.171.0/examples/jsm/loaders/PCDLoader.js"
        }
    }
</script>
JavaScriptファイルURLとして、以下を記述します。Point Cloudの処理はファイルapp.jsにまとめ、インラインにコードは記述しません。

[module,defer]#APP_FILES#app#MIN#.js


処理対象のデータを選択するページ・アイテムを作成します。

識別名前P1_PCDタイプ選択リストラベルPCDとします。設定選択時のページ・アクションとして値のリダイレクトと設定を選択します。

選択リストLOVは、静的値で設定します。


表示値戻り値を同じ値として、bun0.pcdism_test_wolf.pcdism_train_hourse.pcdを設定します。


静的コンテンツのリージョンを作成します。ソースHTMLコードとして、以下を記述します。pcl.jsのExamplesのindex.htmlの内容ですが、表示領域を全画面ではなくAPEXのリージョンにするため、IDがcontainerのDIV要素の高さを600pxで固定しています(class="h600"の設定)。

<h1 id="progress" style="position: absolute; z-index: 9; right: 50%; top: 50%;">
Loading...
</h1>
<div id="container" class="h600">
<canvas id="canvas"></canvas>
<div style="
position: absolute;
z-index: 1;
top: 10px;
right: 10px;
background: rgba(0, 0, 0, 0.5);
color: #fff;
">
<fieldset>
<legend>Select display mode</legend>
<div>
<input type="radio" id="mix" name="display" value="mix" checked />
<label for="mix">Mix</label>
</div>
<div>
<input
type="radio"
id="original"
name="display"
value="original"
/>
<label for="original">Original</label>
</div>
<div>
<input
type="radio"
id="keypoints"
name="display"
value="keypoints"
/>
<label for="keypoints">Keypoints</label>
</div>
</fieldset>
</div>
</div>

共有コンポーネント静的アプリケーション・ファイルとしてapp.jsを作成します。ファイルに以下のJavaScriptコードを記述します。描画領域の幅と高さの設定と、描画するデータのロード方法については、元のコードを変更しています。また、元のコードはpcl.jsのバージョンにpcl-core.wasmのバージョンを動的に合わせるようにしていますが、少々難しいのでバージョン番号をURLに直書きしています。

import * as PCL from "pcl.js";
import PointCloudViewer from "pcl.js/PointCloudViewer";
import {
BufferGeometry,
PointsMaterial,
Points,
Float32BufferAttribute
} from "three";
let cloud;
let keypoints;
let viewer;
main();
async function main() {
const pcdFile = apex.item("P1_PCD").getValue();
if ( pcdFile === null ) {
/* 何もしない */
return;
}
const data = await getPCDData(apex.env.APP_FILES + pcdFile);
await PCL.init({
url: 'https://cdn.jsdelivr.net/npm/pcl.js@1.16.0/dist/pcl-core.wasm'
});
cloud = PCL.loadPCDData(data);
const resolution = PCL.computeCloudResolution(cloud);
const tree = new PCL.SearchKdTree();
keypoints = new PCL.PointCloud();
const iss = new PCL.ISSKeypoint3D();
iss.setSearchMethod(tree);
iss.setSalientRadius(6 * resolution);
iss.setNonMaxRadius(4 * resolution);
iss.setThreshold21(0.975);
iss.setThreshold32(0.975);
iss.setMinNeighbors(5);
iss.setInputCloud(cloud);
iss.compute(keypoints);
showMainPage();
showPointCloud();
bindEvent();
}
async function getPCDData(url) {
return await fetch(url).then((res) => res.arrayBuffer());
}
function showMainPage() {
document.getElementById("progress").style.display = "none";
document.getElementById("container").style.display = "block";
}
/*
* containerの幅と高さを返す。 -- APEX向けに作成。
*/
function getActiveRect() {
const props = document.getElementById("container").getBoundingClientRect();
if ( props.height === 0 ) {
// 400はヘッダーやフッターの高さ、概ね固定値。
props.height = window.innerHeight - 400;
}
return props;
}
function showPointCloud() {
/* APEXのリージョンに合わせる */
const props = getActiveRect();
viewer = new PointCloudViewer(
document.getElementById("canvas"),
props.width,
props.height
);
mixCloud();
viewer.setCameraParameters({ position: { x: 0, y: 0, z: 1.5 } });
window.addEventListener("resize", () => {
/* APEXのリージョンに合わせる */
const props = getActiveRect();
viewer.setSize(props.width, props.height);
});
}
function bindEvent() {
const radioOriginal = document.getElementById("original");
const radioKeypoints = document.getElementById("keypoints");
const radioMix = document.getElementById("mix");
[radioOriginal, radioKeypoints, radioMix].forEach((el) => {
el.addEventListener("change", (e) => {
const mode = e.target.id;
viewer.setPointCloudProperties({
sizeAttenuation: false,
color: "#FFF",
size: 1
});
viewer.removePointCloud();
viewer.removePointCloud("point-cloud-mix");
switch (mode) {
case "original":
viewer.addPointCloud(cloud);
break;
case "keypoints":
viewer.addPointCloud(keypoints);
viewer.setPointCloudProperties({ color: "#F00", size: 6 });
break;
default:
mixCloud();
}
});
});
}
function mixCloud() {
viewer.addPointCloud(cloud);
const position = [];
const points = keypoints.points;
for (let i = 0; i < points.size; i++) {
const point = points.get(i);
position.push(point.x, point.y, point.z);
}
const geometry = new BufferGeometry();
const material = new PointsMaterial({
sizeAttenuation: false,
size: 6,
color: "#F00"
});
geometry.setAttribute("position", new Float32BufferAttribute(position, 3));
const mesh = new Points(geometry, material);
mesh.name = "point-cloud-mix";
viewer.scene.add(mesh);
}
view raw app.js hosted with ❤ by GitHub

以上でアプリケーションは完成です。

今回作成したAPEXアプリケーションのエクスポートを以下に置きました。
https://github.com/ujnak/apexapps/blob/master/exports/sample-pcl-js-keypoints.zip

Oracle APEXのアプリケーション作成の参考になれば幸いです。